
Good Morning Crafters!
I hope you are all well and still finding time to be creative and continue to be inspired in this crazy world!
Today I'm sharing a step by step on how I created this fun, playful layout. Once again using these wonderful Gnomie Love papers by Paper Rose Studio.

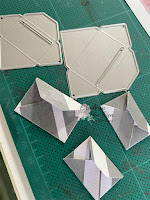
Start by taking your card stock and gut out the center leaving Approx. a 2'' boarder this means you can use left over cardstock for photo mats and creating embellishments, This boarder will be the base for your layout.
(see picture below)

Next take one of your patterned papers and use this as the background (I have used Gnomie Love F) and trim this down to 11''x11'' sand the edges and adhere down to your white boarder leaving a 1'' gap.
(see picture below)

The next part was just about playing around with different papers in the collection, I had a few pieces I had left over from other projects that i wanted to use up.
Measurements are as follows you'll need to cut 7 pieces from random patterns
1 - 2''x4'' Gnomie Love C
1 - 6''x4'' Gnomie Love B
1 - 2''x6'' Gnomie Love C
2 - 4''x4'' Gnomie Love B/E
2 - 3''x4'' Gnomie Love B
(see picture below for reference of Placement)

As you'll see in the next photo I changed the layout just so that my photos wouldn't be right next to each other. Choose your photos and the size to fit as little or as many of the mats as you want.
Here I have used 2 - 3''x3.5'' photos, I've distressed the edges and adhered onto white cardstock leaving about a small border.
Distress or sand the rest of the mats and then adhere into place
(photo below for reference)

Once you have adhered all of your mats into place on your page its time to decorate each section.
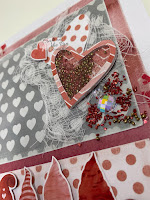
Here I've taken a Uniquely creative heart die and made up a little shaker as an embellishment.
Cut your hearts out I've done 3 then you want to use your craft knife to cut a center out of one of the hearts. Adhere his onto some acetate and trim around the edges.
Using foam mount tape you want to place this around the outside of a full heart - using different glitter/micro beads and bling place some into the full heart that you've put the foam around. Then stick your acetate top onto the foam.
(Use pictures below for step by step)


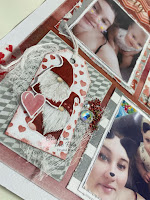
I've then adhered this down onto one of my mats with some muslin underneath.


then adhered to a mat along with some muslin and some little gnomes
(as pictured below)

Also using another Die I created these sweet little envelopes and attached little bows that i had previously fussy cut.

Of course a little Gnomie Feature - Fussy cut from the Gnomie Love - A paper.

Don't forget to add your title to one of the mats I've surrounded my title with some of these super sweet little love hearts cute from the Gnomie Love - D paper.

To finish off my layout I've used a mixture of Crushed Glass, Micro beads and Rhinestones scattered around different areas of the page.
(see pictures below)


Edge with some washi tape and your layout is now complete!

Thank you so much for reading/playing along today! I hope I've inspired you to make some of your own embellishments and really use up majority of the page.
Please follow the links below to products used in todays layout.


Once again thank you for stopping by and taking the time to read the blog...
Until next time... Remember Crafting is cheaper than therapy!
- Crystal xx

Don't Forget to follow us...

No comments:
Post a Comment