Friday 30 July 2021

Mintay Lady Collection - Tutorial #2

Hi everyone. Jacquie Hay here with a new DT post for Craft on the Run. 

We all love Mintay Papers but often they are so stunning that sometimes we don't know what to do with them, so the Craft on the Run Design Team is here to help with how you approach these collections so you have the confidence to use these papers.
As an added bonus and to encourage you to play along and give these tutorials a go we are doing a Mintay Giveaway...
Create a project based on any of the tutorials and share in the group/album telling us which tutorial you used and you go in the draw to win some stunning Mintay Papers.
Your creations must be based on the Design Team tutorials. And you must use any Mintay Collections
What do you think?
Want to give it a go?
If you are ready to share follow the link below and add your creation in the album.


I'm still using the Mintay Lady Collection to make a scrapbook layout.


The first thing I did was to choose papers for my layout.


I then gutted the centre of a sheet of white cardstock - leaving a one-inch border, so I can use the centre to mat my photo later.


I chose a floral pattern (MT-LAD-04) for my background and trimmed it to 11.75". I then sponged the edges using Tim Holtz Vintage Photo Distress Ink, and attached it to the white cardstock border.


Next, I tore a piece of MT-LAD-01 approximately 6" x 12", inked the edges, and placed it across the centre of my layout.


I then stitched around edge of the layout, using green embroidery thread.


Next, using the centre of the white cardstock I saved earlier, I cut some leaves using Uniquely Creative's Mixed Leaves Die


Next, I used a gloss spray - Dina Wakley's Fir Gloss Spray - in a couple of places where I intended to put my embellishment clusters.


I then fussy-cut some flowers and leaves from patterned paper - MT-LAD-03.


The next step was to mat my smaller landscape photo , which measured 3" x 4". 

I attached a 4" x 6" landscape photo to the right of the layout with double-sided tape, and attached the 3" x 4" landscape photo to the left using foam tape.

Next, after inking the flowers I fussy-cut previously with Vintage Photo Distress Ink, I attached them using foam tape.


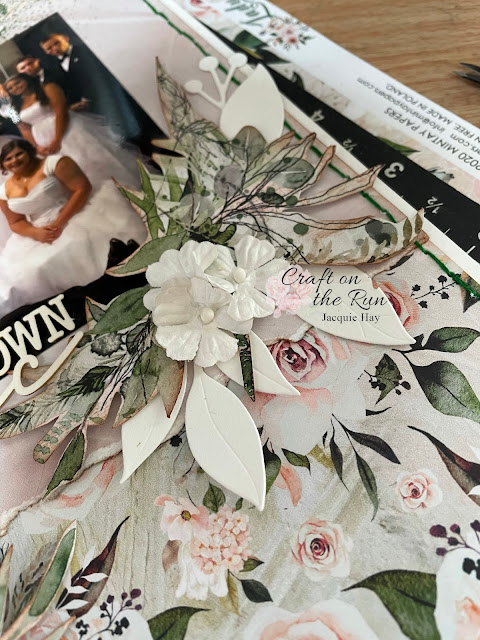
I added some Uniquely Creative White Flowers and the leaves which I cut earlier. The next step was to add a title from Uniquely Creative's Tranquility Laser Cuts.

My layout was now complete!


Here are some close-up photos, so you can get a better idea of the textures and layers.


The images below are linked to their product pages in the Craft on the Run online shop: 


Uniquely Creative's Mixed Leaves Die


Stay tuned for more tutorials throughout the month, and don't forget to try a tutorial and share with us to have a chance to win some Mintay goodies for yourself!


Till next time, have a creative day - Jacquie.


Wednesday 28 July 2021

Mintay Urban Jungle- All Things Grow With Love

We all love Mintay Papers, but often they are so stunning we don't know what to do with them, so the Craft on the Run Design Team is here to help with how they approach these collections, so you have the confidence to use these papers. 

an Added bonus and to encourage you to play along and give these tutorials a go,we are doing a Mintay GiveAway..... 

Create a project based on any of the tutorials and share in the group/album telling us which tutorial you used and go into the draw to win some stunning Mintay Papers. 

Your creations must be based on the Design team tutorials and must use any Mintay Collection.

                                             What do you think? 

                                             Want to give it a go? 

If you are ready to share follow the link below and add your creation in the album. 


Its Debra here today sharing another layout using the beautiful Mintay Urban Jungle collection

My first step  was to choose a background paper . I chose sheet number 4.


Next I chose to use sheet number 3 and fussy cut the images I was going to use. 


Placing them on my layout I decided to cut them into 2 pieces so I would see more of the image once the photo was in place.


 I cut a frame, one with the film strip from sheet no.6 again cutting it in half adhering behind my photo at the top and bottom of the photo.


I use some of the pieces I had previously fussy cut from the images on the back of the cover sheet.


 Next I used some of the Cardboard stickers to add a bit more interest to my layout. 


Now my layout is complete and I am happy with the results.

Here are some closeups so you can see the details.


Products Used


MT-URB-04


MT-URB-03


MT-URB-06


MT-URB-10


Monday 26 July 2021

Messing with Mintay - Florabella - includes Video (2)

   Hello Chit Chatters.....

Robyn Leeanne here and this month is Mintay Month.

 We at Craft on the Run have heard a few rumblings from people who seem to struggle a little with the beautiful Mintay Collections. Yes we to know that sometimes they can be a little intimidating. Sometimes I would rather just frame each paper and put them on my walls.

We all love Mintay Papers but often they are so stunning that sometimes we dont know what to do with them, so the Craft on the Run Design Team is here to help with how they approach these collections so you have the confidence to use these papers. 

As an added bonus and to encourage you to play along and give these tutorials a go we are doing a Mintay Giveaway...


Create a project based on any of the tutorials and share in the group/album telling us which tutorial you used and you go in the draw to win some stunning Mintay Papers.

Your creations must be based on the Design Team tutorials and use any Mintay Collections

What do you think?

Want to give it a go?

If you are ready to share follow the link below and add your creation in the album. 

I created a short video for you to watch of how I used the Florabella collections busiest piece of paper.


Items I Used:


Just a couple of pieces of ephemera cut from the Florabella Collection

Contrasting plain colored cardstock


Keep your eyes peeled for more videos on Mintay very soon.


Stay tuned for the next creative adventure.


Sunday 25 July 2021

Reach for the Stars Mintay Nightfall Process Video - Rikki G

 Good Morning how are you? Rikki here with my second tutorial for Mintay month at Craft on the Run.... How are you liking the tutorials so far? Feel like you can acheive something with these papers now?


We all love Mintay Papers but often they are so stunning that sometimes we dont know what to do with them, so the Craft on the Run Design Team is here to help with how they approach these collections so you have the confidence to use these papers. 

As an added bonus and to encourage you to play along and give these tutorials a go we are doing a Mintay Giveaway...


Create a project based on any of the tutorials and share in the group/album telling us which tutorial you used and you go in the draw to win some stunning Mintay Papers.

Your creations must be based on the Design Team tutorials.

What do you think?

Want to give it a go?

If you are ready to share follow the link below and add your creation in the album. 


          So heres a process video so you can follow along if you want to recreate this layout:


When looking at papers like this I like to see if halving the pattern will help it be less complicated.....
I know fussy cutting doesnt seem to be less complicated but it can help you add a smaller portion of details to a simpler background.

Remember a great pair of scissors and a scapula are you best friends


Adding simple embellishments like there's Uniquely Creative Stars help add some interest without over whelming the page.


A great washi tape can add an informal board to the bottom of the page and adding a little chipboard title can act as a journal strip.


MT-NIG-01 – Purple Cloud/Picnic

MT-NIG-09 – Fussy Cut Sheet

966638 – Stars & Moons Moulds


Till next month I hope you get creative.