
Hi Crafty Peeps, it's Sharon here showing you another layout.
I've done using this fun paper range "Sweet as Honey" from Photo Play.

As soon as I saw this paper range, I knew it would go perfectly with this photo of Natalie.
Here is my step by step.
Step 1. Trim a square 10" x 10" from Sunflowers paper. Trim a piece of white cardstock to 11.5" x 11.5"

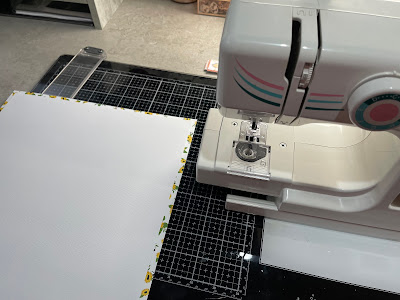
Step 2. Out comes the sewing machine, (omit this step if sewing is not your jam and just stick it down) and stitch the white cardstock to the frame piece of Sunflowers paper.
Step 3. Flip the Sunflowers paper and use the lovely check side. Fold a "dog ear" on the right corner, mine is 2.5" wide, now stitch this to the center of the white cardstock.

Step 4. Collect your embellishments. I've fussy cut some elements from Buzzing By and Pre-coloured Dies paper, two different lace trims, "2018 chipboard", a felt heart, a flair and I have used a Uniquely Creative thin die - Honeycombe and cut from white cardstock (I've also kept some of the negative honeycombe shapes to use). Cut a strip from Buzzing By, 6" x 1/2" and punched one edge using a Scallop punch. I always pull out way more embellishments than I actually use!

Step 5. I've printed my photo 4.25" x 4" with a white border, don't worry if you do not print photos at home, just mat your photo with white cardstock. My photo is popped up on foam tape and
I've tucked the honeycomb die-cut around the photo.
Step 6. Stick a piece of lace, approximately 6.5" wide, directly under the photo. Stick the 6" scalloped piece of paper under the photo and on top of this piece of lace. Stick a smaller piece of lace (I've used a little heart one) approximately 5.5" wide on top of the Scallop paper.
Place the embellishment cluster on the bottom right of the photo and the Large felt heart,
flair and fussy cut flower to the top left of the photo.

Step 7. My title is printed on the fussy cut banner. First I print it on printer paper to make sure I have the correct size to fit the banner, then I draw lines on the paper so I can line everything up perfectly, then stick the banner over the print, make sure you use tape that is not permanent or it will be hard to remove the embellishment from the printer paper. Pop it back through your printer and all done.


Step 8. I've printed out my sub-title one Cardstock, along with Natalie's birth date,
and added my chipboard year.
Step 9. I've grabbed 5 of the negative hexagon shapes and popped them up on foam dots and randomly placed them around the layout.

Thanks for looking!
Here are some of the items used


Until next time... happy scrapping

No comments:
Post a Comment