
Can you believe its nearly Christmas?.... Nope, neither can I crafters!
Well its Crystal back here with you today
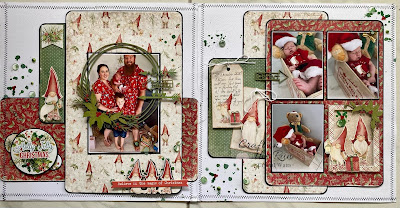
and I'm sharing with you a double layout
Aren't these gnomes just the cutest damn things ever?
As soon as seen these papers I knew I had to do a double layout that featured my
2020 family Christmas photo and my smooshy Elijah
who by far was the best Christmas present I've ever received.

I started by taking two 12x12 pieces of white cardstock and taped them together on the back so I could work with a blank canvas.
I picked 3 random pieces of patterned cardstock from the collection (the green is from the 6x6 paper pad) With these sheets I trimmed them into random lengths and widths, mounted them all on black cardstock to separate them and started playing with how i wanted them to be arranged on the page.
** TIP - Take pictures from a birds eye view with different arrangements as to see where you like things best.

I also knew I wanted these pages to tell a story and have at least 5 spots for photos.
The LHS has a picture that is 4x6'' and the RHS has 3 (but could be 4) pictures that measure 3x4''
I also mounted these on black cardstock to define them from the pattern paper.

As you can see in the picture above, instead of 4 photos I only used 3
and this was because I just wanted to use up some of the beautiful little gnomes.
I used my blade and cut out the frames from the cut apart sheet and re positioned the gnomes and used my distress tool to add character to the edges.

I used a couple of the tags, these were perfect for some journaling, adding dimension by cutting a second gnome and mounting it with foam tape to one of the tags.


I had some Christmas chippy in my stash (Lets face it I'm sure we all do) so I used this to frame my main photo...
but I just couldn't find the write colour ink to so I used my Markers and I'm very pleased with how the colours turned out.

Lots of layered chipboard

I Had some Mintay - Merry and Bright Chipboard stickers that worked perfectly with this paper range so I used these to fill some of my gaps
**TIP - Create dimension that draws your eye by sticking them onto cardstock first and cut them out leaving a small boarder**

Using Rustic Wilderness Oxide Spray I created random droplet spots in blank areas of the paper and glued Glass Domes and Bling over the top (as seen in picture below)

I didn't quite like that it had no boarder so to finish off my layout I used a "Darkroom Door - Stitched Boarders" Stamp
** TIP - To create this affect you could easily draw it on with a fine line pen**
My Completed Layout for you once again... just have fun with it, I say the more gnomes the better!
Thank you for taking the time to read my blog post today.
I hope you continue to be inspired!
I have linked some of the products used, just click on the links below and it will take you straight to the Craft on the Run online store


Don't Forget to...


Until Next time Remember crafting is much cheaper than therapy!!

No comments:
Post a Comment